How to make your own t shirt with our t shirt online designer?

Have you ever thought about creating and customizing your own t shirt? It’s now possible courtesy of make your own t shirt online designer. We allow you to choose your images and design for as many tee’s or clothes that you want. You can transfer and upload any image you want to use. You can invent and keep your own unique gallery by mixing all your decoration designs; it doesn’t matter if it’s a digital print or embroidery; mixes both of them to get your own designs and images. Images, photos, artworks, text are some of the options available from our design elements.

Logo pic 13

DECORATING AN EXISTING TEE-SHIRT

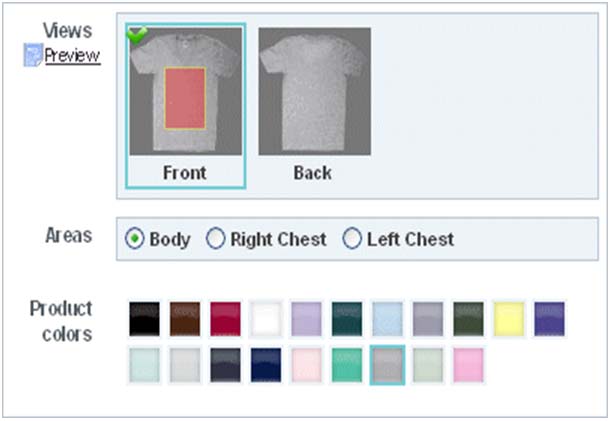
  • If you need to decorate any existing product, you need to choose a particular view or place to decorate; it can be the front or back.
  • Then you select the particular place you want to decorate chest or body.
  • You can add your photo or image to the selected place and make sure you confirm the colour, size and quantity.
  • Once you are sure of all these, then you can check it into your cart.
Decorating An Existing Tee Shirt

DECORATING SEPARATE FABRICS OR ITEM

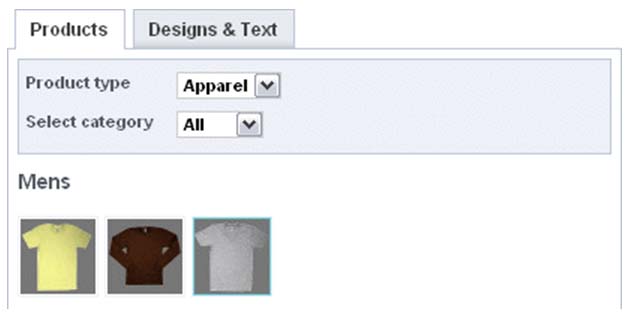
  • Go through your tab, look for products and then click it.
  • Choose the particular type of different product you want and decorate it just as it is described in ‘A’ above.
Decorating Separate Fabrics Or Item

SAVING YOUR CUSTOMISED DESIGN TO USE IT LATER

  • At the right end of your page, you’ll see Save design, click it.
Logo pic 14

CHANGING AN ALREADY CUSTOMISED PRODUCT IN YOUR CART

  • Go to the tab and click on Cart.
  • Select the customised product you want to modify.
  • Carry out the change you want.
  • Click Update.
Changing An Already Customised Product In Your Cart

CREATING VARIATIONS OF AN ALREADY CREATED CUSTOMISED PRODUCT.

  • On the tab, click on Cart.
  • Find the existing product you want to change.
  • You need to have the product in your cart so click Duplicate.
  • Now you effect any change you want.
  • Don't forget to implement your change by clicking Update Item.

CREATING A DESIGN FOR ANOTHER CUSTOMISED ITEM.

  • Go to tab and click Cart.
  • It will bring you options but click Add Another.
  • Select the blank item you want.
  • Add the image, photo, design or text you want.
  • Click on Add to Cart.
  • Be sure you secure your item by clicking Cart and then Check Out.
Add Printing Image

HOW TO ADD IMAGES

There are single or multiple images you can use either from our stock images or your own; but note that if you are using personal images, you must transfer them online with your computer. It’s quite easy.

You first locate your Designs & Text tab and click on Add Printing Design. The next thing that will come up is Select Artwork. There will be a category list the option you will choose is the folder that reads My Designs. Click on the icon that says browse and transfer the picture you will use from your device or computer

BEST IMAGE OR PICTURE QUALITY AND SIZE.

All pictures to be uploaded and used must be high resolution.

It must also be very large because every picture uploaded will be made to be extremely large but this won’t affect the picture quality. This is what the online designer does.

The clothing item online is listed in some specific sizes such:

  • Medium men.
  • Medium Youth.
  • Women’s size 10.

You can always change it from these specific sizes to any size you want When you see the quality meter change from green to amber (which is a colour between gold and orange, it means the picture has been scaled upwards. You can get the picture quality you want.

The only reason why you won’t get your desired picture quality is when the quality meter changes to red. This means you need to either resize your design a little lower or get another image with a better quality or higher resolution.

You’ll receive a notice if the picture quality on your ordered fabric will come out poorly.

It’s usually happens when the image is too large.

RESIZING IMAGES & CHANGING ITS PLACEMENT.

You have to think of choosing your preferred size.

Once you are done attaching the picture or image to the fabric and there’s no problem with the quality or resolution, you need to choose the image size you prefer as there are many sizing options.

You can select by clicking on the size handle you prefer which you’ll see on the control panel which should be by your right side. With the control panel, you can be rest assured that you will gain total control of the image while resizing.

Another important factor is creation of layers. This is because if you want to mix many elements such as many pictures, art works or texts, the placement of each element on another must be aligned and in good order.

This is the layer order.

To do this, choose any element under the Design Mode; you’ll see the layer right in the Designs & Text panel which should be by your right. Change your layer order with the arrows that move up and down right beside the delete button.

Design Mode Moving

To Delete

If you find out a particular image is unnecessary, locate your Designs &Text panel and simply click Delete.

Design Mode Delete

To Rotate

In the Designs & Text panel is your rotate button. You simply select what you want to work on and click Rotate. Use the navigation arrows to the left and right to rotate the image either to the left or right. Use your mouse to position your dial.

Design Mode Rotate

To Position

Use your mouse to click and drag any object you want to reposition.

In the Designs & Text panel, use the position arrows which is the navigation arrows that point to the left, right, up and down.

Design Mode Position

To resize objects

With the aid of your mouse, resize all objects by dragging the size handles.

In your Designs & Text panel, locate the Size control and make any changes you want on the size while you’re working with your mouse.

Design Mode Size Control

Transparency

Some images don’t require a white box. If the images you uploaded are ok and do not need the ‘white box’ then you can do away with it.

You only need to click on the Select Transparent Colour option and choose white to remove any trace of white and white box.

You can choose any colour to replace the white only be sure it blends well and it mustn’t be the same colour with the image.

Design Mode Transparency

To Gauge the quality of your print

The colours of the quality meter include:

  • Green – the print will come out well
  • Yellow – the print is Ok
  • Red – the print will not come out well Over scaling an image will make you receive a warning to inform you that the picture, image or embroidery will not turn out well in your required size.
Design Mode Quality

For your Effects and Borders

One advantage of the make your own t-shirt's online designer is a wide array of effects and borders to help you get a satisfactory print for your shirt.

Still within the Designs & text panel, locate Advanced link and click on it, then you’ll see Effects and Borders with the help of the Preview panel, you can access special effects.

To choose a desirable border, use the Borders tab.

Design Mode Effects

To Create Texts

There are a number of things you can do to your text like positioning, rotating, colouring, resizing and giving it a special effect.

There are 2 ways to control your text

  • Use the Designs & Text panel
  • Click and drag your mouse.

You need to click on Printing Text to type in the text in your popup dialog. If you want to edit the text, select your text and use the available controls in the Designs & Text panel.

To control and place texts

Once you create a text block, the product will also have a layer for it. The benefit of many layers is that you can place and control your text in any way because of the availability of controls.

Some of the controls include:

  • Alignment: to the left, right and centre if you use multiple text.
  • Positioning: You do this by selecting up or down and right or left. You can use your mouse to move your text anywhere on the design area.
  • Sizing: use the plus button to make the text larger and the minus button to make the text smaller.
  • Rotation: Use the mouse to click the left or right arrows to rotate your image.
  • Font: to choose a desirable font, click on the drop down arrows.
  • Colour: you can choose your font colour by clicking on the colour palette.
  • Bold and Italics: select your text and click on the bold and italics option.

To Edit text

Locate the layer control and click the Edit Text link to edit the selected text object.

Design Mode Edit Text

To select fonts

Clicking the font selector will bring up the font popup which is what enables you to change your font and also places each font in its own category. Choose your category and the font will come up in your right hand panel.

All you need to do is double-click the desired font or select the OK icon which you’ll find at the bottom of the pop-up.

To create special effects

At the bottom of the text layer control, you’ll find the advanced link. Click it and you can create special effects.

To create Effects

Choose the effect you want and select the strength and colour you desire. You can also remove any effect you do not need.

To create shadows

All you need to do is choose the colour of your shadow and add ‘drop shadow’ to the text. You can also create a blurred outline with the help of the BLUR tool. To change the shadow placement, use the OFFSET tool.

Adding a Glow Effect

Pick a glow colour and reposition your shadow angle with the OFFSET tool. Use the BLUR and GLOW STRENGTH tools to create and control your desired blurred outline.

To Stroke

This gives your text an outline. It can either be:

  • Colour Stroke: To create a specific text outline colour.
  • Width Stroke: to create a specific width for the text outline.

To create Gradient Colouring

There are two types of gradient that you can apply to the surface of the text. For both colour blends, use a second colour

  • Vertical Gradient: gives a vertical colour blend to the body of the text.
  • Horizontal Gradient: gives a horizontal colour blend to the text body.

Text warping: this gives you the option of a curve to use. Some of these options are:

  • NONE: to remove all warping effects.
  • WAVY: for creating a desired wave effects and to control all wave effects.
  • EXPANDING: for all your perspective effects. It makes you create and direct your perspective effects.
  • FISHEYE: for any form of ‘fat text’ or wide effect.
  • SQUEEZE: for ‘skinny text’ or slim text effect.
Logo pic 15

Buying Your Item

Placing orders

When you are done placing your orders, always ensure you click the Add to Cart icon which you will see at the end of the online designer.

Once you place an item in the cart, you will see a shopping cart that will allow you to buy as many items as you want.

Design Mode add to cart

To create a design for many sizes

If you made a design for many sizes of a product, locate the Size dropdown and click on multiple sizes. The quantity box will show you the sizes that are available. Type the number of quantities you require and click on ‘Add to Cart’

Design Mode Multiple Sizes

To get rid of some products you put in your cart

Click the Cart tab to see all the products you purchased and click on Remove to get rid of the product you are no longer interested in.

Design Mode Remove From Cart